


As you know, Docker can create virtual networks for secure and convenient network interaction within containers. In this article, we will explore how it accomplishes this, using basic network manipulations within a single host with a Linux operating system as an example.
A Brief Theoretical Overview
To understand what will happen next in the article, let’s delve into a bit of theory. If you have experience configuring networks in Linux, feel free to skip to the next section.
Just to be clear in this section, I’ll briefly explain what lines like 192.168.0.1/16 mean.
The /16 part signifies that the first 16 bits of the IP address are for network identification, and the remaining bits are for node identification.In the example given earlier, 192.168 is the network-identifying part, and 0.1 is the node-identifying part.
/32 means that a specific IP address for a node is specified.
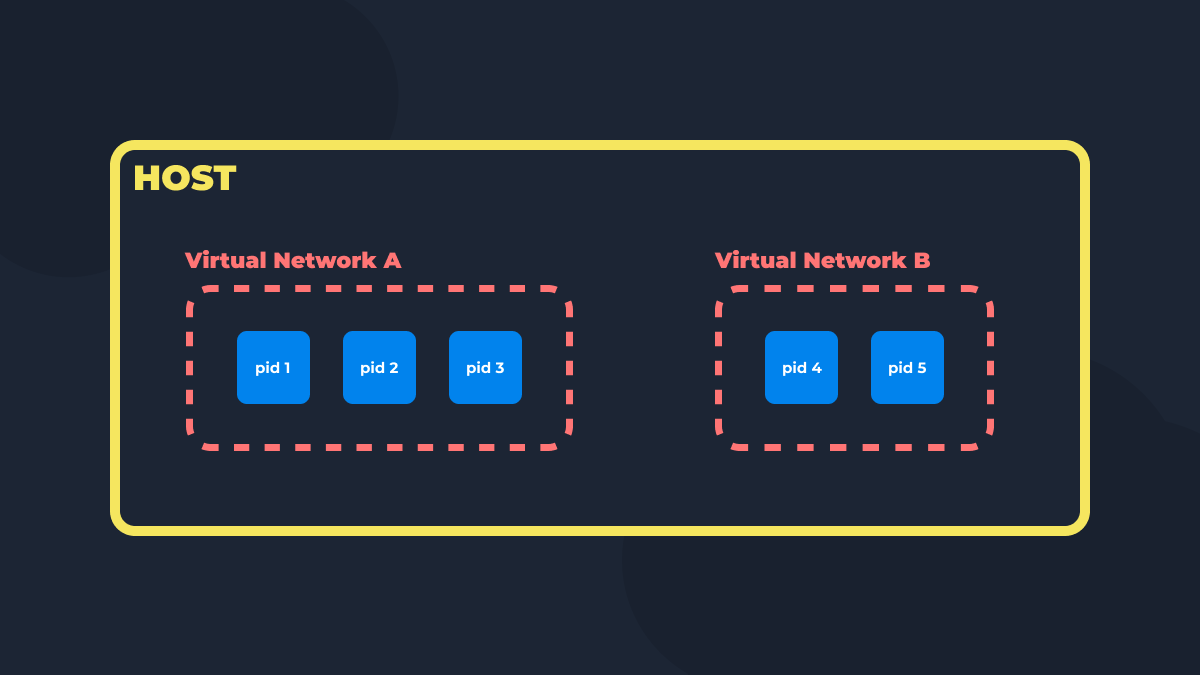
Network Namespaces (netns)
A Network Namespace in Linux is an isolated environment for network resources. It has its own IP addresses, routing tables, firewall (discussed below), and so on.
They are useful when, for example, you have two virtual machines that you want to connect to each other but isolate from other networks. Or, if you need to do the same thing but with containers :).
Virtual Network Interfaces
Virtual network interfaces are, essentially, logical representations of physical ones. They are used for routing, tunneling, creating virtual networks, and so on.
We will use loopback (or lo or localhost), veth, and bridge, so let’s delve into them a bit more.
loopback (localhost):Provides the ability to exchange traffic within the device itself. Used for internal communication between applications and testing. Accessible through addresses127.0.0.1 - 127.255.255.255.veth (Virtual Ethernet):A virtual Ethernet cable that connects two points in a virtual network, enabling traffic to be transmitted between them.Bridge:Essentially, it is a virtual switch. A switch is a device that connects various network devices for traffic exchange.
Firewall
Firewall is used for filtering both incoming and outgoing traffic. It can be in the form of a physical device or a virtual logical implementation. We will use the latter for additional isolation of network namespaces.
NAT (Network Address Translation)
NAT is a technology that transforms internal IP addresses into external ones and vice versa. For example, when connected to the same Wi-Fi from a phone and a computer, both devices will have a single external IP address. NAT will change the incoming traffic’s IP address from the router to the internal IP address of the device to which the packets are addressed. And vice versa, the IP address of outgoing packets will be changed to the router’s IP address.
This is needed to save public IP addresses, as their quantity is severely limited (around 4.3 billion, of which 81% are already assigned or reserved).
How Docker Does It?
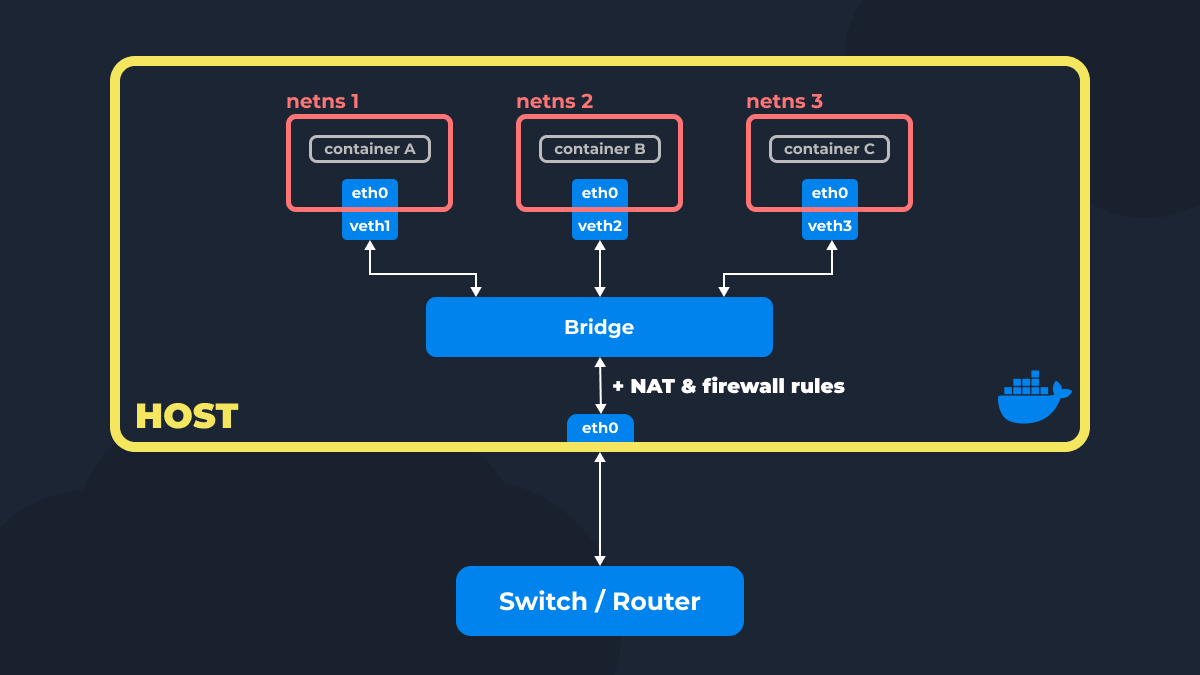
Docker creates a network namespace (netns) for each container. If you haven’t specified a network when creating a container, it connects to the default network (under the hood, a bridge) using a pair of veth interfaces. This default setup enables containers to communicate with each other.
However, just this wouldn’t be enough. For containers to send IP packets, they need to know the starting point to build a route to other containers connected to the same Docker network (bridge). This starting point (gateway) becomes the bridge itself to which the container is connected. Essentially, it looks like this: “For traffic sent to IP addresses in the subnet 172.17.0.0/16, set the gateway to 172.17.0.1.“
Apart from the bridge network driver we just discussed, Docker has other drivers, like:
--network none: The container is not connected to anything and has no access to the internet through the host network. It only has a loopback interface.--network host: The container is connected to the host network.
For internet access, Docker adds NAT rules for IP address substitution for packets sent from Docker network bridge interfaces. This is done so that container IP addresses are changed to the IP address of the outgoing interface (or the host’s IP address), which is used to route to the internet. Additionally, Docker adds a default gateway to the routing table of each container, so packets for all addresses are sent through the bridge interface, which has access to the host network.
Docker also adds firewall rules to prevent traffic redirection from one Docker network to another, ensuring their isolation.
When you publish a port from a container using -p <external port>:<internal port>, the internal port becomes available on the host’s local network. By default, Docker maintains a “docker-proxy” process for this, redirecting the necessary ports to the address of the container and its internal port. This legacy process will soon be fully removed from Docker in favor of hairpin NAT, but for now, you can manually disable it by adding the --userland-proxy=false flag to the daemon.
In simple terms, hairpin NAT is a process where a packet is sent to an external node’s address but is then directed back to a node inside the same local network.
Docker also has other networking capabilities, such as creating overlay networks to connect multiple Docker daemons, creating IPvlan networks to connect containers without using a bridge interface, and more. However, this won’t be covered in the current article due to the abundance of information.
Practical Section
Now, let’s create a virtual network with internet access and expose TCP port 8000 from this network to the host’s network. This port will be accessible through 127.0.0.1 and other machines in our network (similar to docker -p <external port>:<internal port>).
Most explanations will be in comments within the code blocks.
In the upcoming sections of the article, I’ll use iptables for Firewall and NAT modifications. I understand that it’s considered outdated, but Docker continues to use it, so I chose to use it as well, instead of nftables.
Step #1 – Creating a Network Namespace
Let’s start by creating a netns and running a simple Python HTTP server inside it.
# Create netns named "red"
ip netns add red
# Set an IPv4 address for the loopback interface, as it's not set by default
ip -n red addr add 127.0.0.1/8 dev lo
# Enable the loopback interface
ip -n red link set lo up
# Run an HTTP server within the new netns
ip netns exec red python3 -m http.server
Now, the server can only be accessed from within the netns (ip netns exec red curl 127.0.0.1:8000). It’s fully isolated for now.
Step #2 – Creating a Bridge Interface
Now, we need to create the bridge interface and connect the previously created netns “red” to it.
#Create bridge interface named br0
ip link add br0 type bridge
# Set an IP address for the bridge interface
ip addr add 10.100.0.1/24 dev br0
# Enable the bridge interface
ip link set br0 up
# Create a pair of veth interfaces named red0 and red0.br0
ip link add red0 type veth peer name red0.br0
# Connect one veth interface to the bridge and enable it
ip link set red0.br0 master br0
ip link set red0.br0 up
# Move the second veth to our red netns, set its IP address, and enable it
ip link set red0 netns red
ip -n red addr add 10.100.0.2/24 dev red0
ip -n red link set red0 up
Now, you can ping the netns from the host network and send HTTP requests to the server.
ping 10.100.0.2
curl 10.100.0.2:8000
For experimentation, you can create a second netns, connect it to the bridge, and try pinging one netns from the other.
ip netns exec blue ping 10.100.0.2
ip netns exec red ping 10.100.0.3
You’ll see that ping works as both netns are connected to the same bridge.
Step #3 – Necessary System Parameters
To make everything work correctly, change two system parameters:
sysctl -w net.ipv4.ip_forward=1
sysctl -w net.ipv4.conf.br0.route_localnet=1
Step #4 – Providing Internet Access from the Network Namespace
Add a NAT rule in iptables, allowing forwarding of traffic between interfaces.
iptables -t nat -A POSTROUTING -s 10.100.0.0/24 -o eth0 -j MASQUERADE
iptables -A FORWARD -o eth0 -i br0 -j ACCEPT
iptables -A FORWARD -i eth0 -o br0 -j ACCEPT
ip netns exec red ip route add default via 10.100.0.1
Try pinging an external IP address from the netns:
ip netns exec red ping 8.8.8.8Step #5 – Exposing TCP Port to the Host Network
At this stage, allow accessing the HTTP server via http://localhost:8000 and make it accessible to other machines outside your host network.
# Rules for NAT table
iptables -t nat -A PREROUTING -p tcp -m addrtype --dst-type LOCAL -m tcp --dport 8000 -j DNAT --to-destination 10.100.0.2:8000
iptables -t nat -A OUTPUT -p tcp -m addrtype --dst-type LOCAL -m tcp --dport 8000 -j DNAT --to-destination 10.100.0.2:8000
iptables -t nat -A POSTROUTING -o br0 -m addrtype --src-type LOCAL -j MASQUERADE
iptables -t nat -A POSTROUTING -m addrtype --dst-type LOCAL -p tcp -m tcp --dport 8000 -j MASQUERADE
# Rules for FILTER table (firewall)
iptables -A FORWARD -o br0 -m conntrack --ctstate RELATED,ESTABLISHED -j ACCEPT
iptables -A FORWARD -d 10.100.0.2/32 ! -i br0 -o br0 -p tcp -m tcp --dport 8000 -j ACCEPT
iptables -A FORWARD -i br0 -j ACCEPT
Now, you can access the HTTP server from the host network:
curl 127.0.0.1:8000And send requests to it from other machines using your host’s IP address:
# Replace with your host's IP
curl 192.168.1.15:8000
That’s it! You’ve achieved:
- An HTTP server running in an isolated network namespace.
- Access to this server on port 8000 from the host’s loopback interface.
- Redirection of packets from other machines to your HTTP server via TCP port 8000.